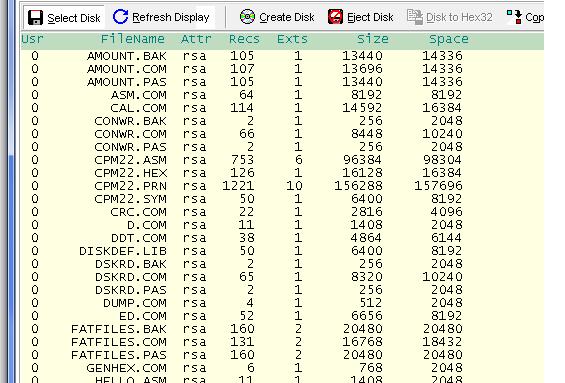
The Z80Emu program versions 2.0 and higher can be used to create and manipulate the contents of a CPM disk pack file used in the Mini80 project. The CPM disk pack file can contain from 4 to 128 CPM disk images. Each of the disk images is one megabyte in size and any CPM disk image can be mounted in any one of the four Mini80 emulated disk drives. This article contains an overview of the disk pack functionality available from the Z80Emu disk manager window.
The disk manager window in the Z80Emu program can be used to manipulate the individual disk images stored in a CPM disk pack file. It is possible to perform the following tasks on a CPM disk pack file;
- Create a CPM disk pack file that contains from 4 to 128 CPM disk images. Each disk image is 1MB in size and the disk images are compatible with the disk files used in the Z80Emu program.
- Import and export CPM disk images as individual files.
- Import, export, delete, rename and set attributes of individual CPM files contained on any CPM disk image file within the disk pack file.
- Update the contents of a Mini80 CPM disk pack file contained on an SD card without causing the disk pack file to become fragmented on the SD card FAT partition.
- Add the CPM boot loader and CPM image to the boot tracks of any disk pack disk image.
To get started run the Z80Emu program and select the Disk Manager tab.
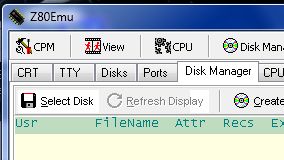
Creating a Mini80 Disk Pack File.
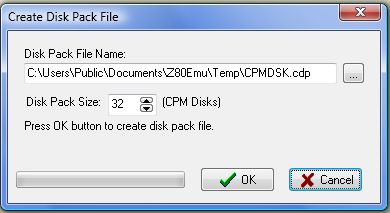
To create a disk pack file select the "Create Disk Pack" button. This will display the Create Disk Pack File dialog.

The dialog will require you the provide the full file name of the disk pack file and the number of CPM disk images to be contained in the file. It is faster to create the disk pack file on your local hard disk then to set the file name to an SD card location. The SD card must have a fresh FAT16 or FAT32 format and not contain any files or folders when the CPM disk pack file is created directly on the SD card or copied from your local hard disk to the SD card.
Opening a Disk Pack File.
To open an existing disk pack file in the Z80Emu disk manager press the "Select Disk" option in the disk manager window. A standard windows file select dialog will be displayed. In the "Files of Type" drop down select the "Emulator Disk Pack" option to display available Mini80 CPM disk pack files. A Min80 CPM disk pack file name must contain the file extension ".cdp".

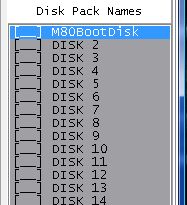
When the disk pack file is opened a list of the individual CPM disk images will be shown on the right side of the disk manager window listing all the disk images available in the selected disk pack file.Select a disk image in the "Disk Pack Names" list to manipulate a specific disk image.
Disk Pack Disk image Operations.
Once a disk pack file has been opened in the Z80Emu disk manager there are a number of commands that can be performed on any selected CPM disk image. Right clicking the mouse on a selected disk image will display a pop-up menu allowing you to select a command to perform.
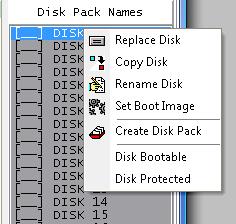
The Replace Disk command can be used to replace the selected disk image with a Z80Emu CPM disk image file stored on your computer (*.cpmdsk). The Z80Emu CPM disk image will overwrite the existing disk pack disk image.
The Copy Disk command is used to save a copy of the selected disk pack disk image as a Z80Emu CPM disk image file.
The Rename command is used to rename the selected disk pack disk image. The name of the disk pack can contain 1 to 16 characters.
The Set Boot Image command is used to build and write a Mini80 boot image to the first two tracks (8K max size) of the selected disk pack disk image. The boot image is made of three parts; boot loader (256 bytes binary size), CPM 2.2 binary image, and the CPM BIOS binary image. The binary images must be saved in 8 bit Intel hex format. I use the CPM MAC.COM program to produce these files. The CPM hex file is the same one used by the Z80Emu program. The boot loader and BIOS for the Mini80 are specific to the Min80 project. Selecting the Set Boot Image command will display the Build Boot Image dialog.
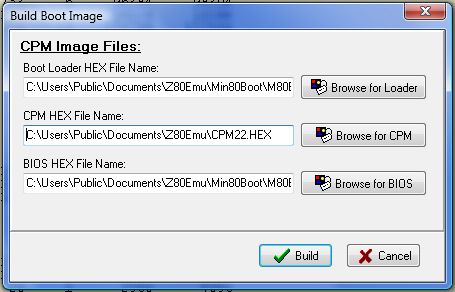
Once you have selected the required hex format files press the Build button. The files will be decoded into simple binary and combined into a single image. The combined binary image will be written to the selected disk pack CPM disk image. The attributes for the selected disk image will be updated to show the disk image is bootable. The Min80 uses the bootable attribute to indicate that the disk image contains a valid boot image. The maximum size of the boot image is 2 track or 8K bytes.
NOTE: A disk pack disk image saved using the Copy Disk command will preserve the boot loader tracks. When the Replace Disk command is used to import the Z80Emu disk image the disk attributes will be cleared. The disk attributes will not indicate that the disk is bootable. You must use the Disk Bootable command to restore the disk bootable attribute to allow the Min80 to boot from the disk image.
NOTE: The Z80Emu program always writes a Z80Emu CPM boot image to any disk mounted in the "A" disk drive when CPM is started (cold boot) In this case any Min80 boot loader will be overwritten by the Z80Emu boot loader.
The Disk Bootable command sets and clears the selected disk bootable attribute. The Mini80 uses this attribute to indicate if a given CPM disk image contains a valid boot loader in its first two tracks.
The Disk Protected command sets and clears the disk protected attribute for the selected disk image. If the attribute is set the Min80 will not allow disk sector writes to the disk image. When the attribute is cleared the disk image can be both read and written to.
Manipulating CPM Disk Files.
Once a disk image is selected in the Disk Pack Names list the disk contents will be displayed in the disk manager window. Any of the standard disk file commands can be used to; import, export, rename, delete, and set attributes of the selected CPM disk files.
