


This article provides an overview of the installation and configuration of the first version of the Squish Play service under Microsoft's Windows operating systems. For an overview of the Squish Play project checkout the article Squish Play Project Overview in the general section.
The first step in running the Squish Play service is to download and install the latest version of the Squeeze Center server software from Logitech. If you are running a version of Squeeze Center prior to 7.4.0 then don't forget to run the start up options program if you want Squeeze Center to run when you are not logged into the Windows . A link to the Squeeze Center start-up program can be found in your Windows start menu. In Squeeze Center versions after and including 7.4.0 the start up options are included in the Squeezebox control program.
When I began testing this release build of Squish Play Logitech released version 7.4.0 of "Squeeze Center" and renamed the server software to "Squeezebox Server". The 7.4.0 release has a number of stability issues (see the many posts on there support forum) and audio playback problems (wave files tick and pop). Until there is a new version I recommend using the older 7.3.4 built. Older versions of Squeeze Center server can be download from slimdevices, click here to go to slim devices site.
UPDATE: At the end of October 2009 version 7.41 of "Squeezebox" server was released. After a few days of testing the new version seams to have fixed any problems I saw with version 7.40. This means the newest version of the Squeezebox server should work fine with the Squish Play service and remote.
Once you have configured the Squeeze Center software and added some music files to its library your ready to install Squish Play.
First download the Squish Play service setup program from this site. The Squish Play setup program requires administrative access to install and control the Squish Play service. Once the Squish Play installation is completed the Squish Play setup program will offer to run the Squish Play service, this will start the Squish Play configuration program.
The Squish Play configuration program is used to configure and control the Squish Play service and to set the Squish Remote settings. If you need to run the configuration after the install process a shortcut to the program can be found in the Windows start menu.
If you are running the Squish Play configuration program under Windows 2000, 2003 or XP make sure that your current account has administrative rights. If your current account does not have administrative rights, right click on the configuration program shortcut and use the "Run As" option to change user rights for the configuration program to an account with administrator rights. Under Vista the program will always request system elevation and will only execute if you allow the program to be elevated to administrative access rights.
Configure the General Tab;
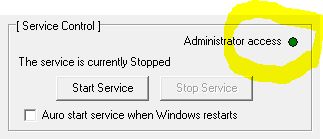
The General tab in the Squish Play configuration program contains the service control settings. The top right of the service control settings area shows a green dot if administrator access is available. If the dot is dark red you do not have administrator access and the service control features will be disabled.
Player MAC Address: This drop-down list contains the physical addresses for all network devices on your computer. The Squeeze Center server identifies each audio player by there MAC address. Normally the first MAC address shown in the list will be the correct choice. You should not change this setting once a player connects to the Squeeze Center server or the server will regard the player as a new player and all settings for the player will revert to there default state.
Server Address: Enter the Windows computer name or IP address of the computer running the Squeeze Center server software. If the computer running the Squeeze Center server software has a dynamic IP address you need to use the Windows computer name or change the server to a static IP address.
Squish Remote: These settings are used to connect to a Squish Remote. If you do not have a Squish Remote leave the "Enable Display COM port" setting unchecked. If you have a Squish Remote device select the Windows COM port the Squish Remote device is connected to then check the "Enable Display COM port" setting.
Configure the Player Tab;
If you are running the Squish Play configuration program under a Windows remote desktop session see the hint below before attempting to set the audio player device.
Audio Player Device: This drop-down list contains the names of all available audio devices on your system. Select the audio device to be used by the Squish Play service. If you want the player to use the Windows default audio device select the "Windows Default" option in the drop-down list. You may want to disable windows sounds from playing on the selected audio card. This can be set in the "Sounds" section of control panel.
Hint: If you are running the Squish Play configuration program under a Windows remote desktop session the configuration program will be unable to enumerate the actual audio devices on the connected computer. Instead the configuration program will show the "Microsoft RDP" audio device. This is normally how you would want a program running under remote desktop to behave but it is a problem when picking the audio device for an audio playback service. To get around this problem the Squish Play service saves a list of the computers true audio devices into a file when it starts up. To use this feature to select an audio device under remote desktop perform the following steps;
- Set the "Audio Play Device" to use the "Windows Default" audio device setting.
- Select the "General Tab", make sure that the "Player MAC Address" and "Server Address" are correct.
- Press the "Start Service" button. Wait for the service to start.
- Wait about five seconds then press the "Stop Service" button. Wait for the service to stop.
- Switch back to the "Player Tab".
- Check the "Use Audio Device File" check box.
- Select the required audio device from the "Audio Player Device" drop down list.
Fade Settings: The fade settings control the duration and audio level used to perform and audio fade in/out. Time is set in seconds and audio levels are set in DBs..
For a fade in effect the "Fade In Seconds" controls the duration of a fade in effect. The "Fade In Start Level" sets the starting audio level for the fade in. The audio will fade up from the current player level reduced by the fade start level back up to the current player audio level.
For a fade out effect the "Fade Out Seconds" controls the duration of a fade out effect. The "Fade Out End Level" sets the final audio level for the fade out effect. The audio will fade down from the current player audio level to the current audio level adjusted down by the "Fade Out End Level" value.
Configure the Remote Tab;
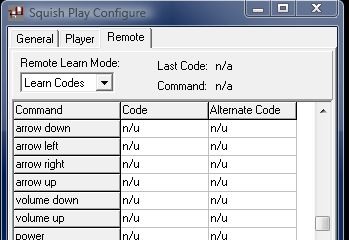
The remote tab is used to learn and test the IR remote control codes used by Squish Play service. As only one program may access a COM port at once, to use the learn or test modes of the configuration program the Squish Play service must be stopped.
The current version of the Squish Remote project expects a remote that uses 32bit NEC IR control protocol. Many older Japanese electronic devices used this IR remote protocol. The Squeezebox interface expects a DVD style D-pad on the remote control device so generally DVD, HD-DVD, and Blue Ray remotes would work the best. As an example the remote from a Toshiba HD-DVD is a good choice as is a remote from an older NEC DVD player. If you can not find a suitable remote around you could uses a low cost universal remote and select a device from the list of DVD codes supported by the remote.
You can test the remote by using the Squish Play configuration program in remote learn mode. If the configuration program accepts IR codes from the remote and each of the remote buttons correctly displays a different code number the remote should work.
Remote Learn Mode: This drop-down list is used to set the current mode of the remote control tab. The three choices are "Remote Off", "Learn Codes", and "Test Codes". Before you may select an operating mode for the remote tab you must; stop the Squish Play service, set the correct COM port for the Squish Remote device, and check the "Enable Display COM port" setting (General Tab).
When "Remote Off" is selected the computers COM port is not activated and the program will ignore IR codes sent by the Squish Remote device. This is the default mode when the configuration program starts up.
When "Learn Codes" is selected the computer's COM port is activated and the program will capture valid IR codes sent by the Squish Remote device. Any valid IR codes received will be applied to the command selected in the code mapping grid.
When "Test Codes" is selected the computer's COM port is activated and the program will capture valid IR codes sent by the Squish Remote device. Any IR code received that matches a mapped command code will cause the code mapping grid to select the command using that code.
There are two columns in the command grid for learned codes, "Code" and "Alternate Code". You must always program the "Code" column before you will be allowed to select the "Alternate Code" column for a command row. If you clear a code from the "Code" column (press delete key) its "Alternate Code" will become the "Code" and the "Alternate Code" will be cleared.
There are two main reasons for using an alternate code for any given command. Some times there is more then one remote button that you wish to map to the same command (ie Play button and D-Pad Select button to the play command), Some remotes generate one code when a button is pressed and a second code if the remote button is pressed long enough to start repeat mode.
Once you have programed the remote codes you may test the configuration by selecting by selecting the "Test Codes" mode Any IR codes received that matches a mapped command code will cause the code mapping grid to select the command using that code.
Once you have complete all required setting press the "Save" button and start the Squish Play service. If you want the Squish play service to start when the computer starts Windows select the "Auto Start Service" check box in the general tab of the configuration program.
If the Squish Play service does not start check the Windows application event log to see if there are any entries posted by the service.
Configure Squeeze Center/Squeezebox Service:
At this point you should be able to open a web browser and connect to your Squeezebox service at the default URL of http://myserver:9000, where "myserver" is the name of the computer, or IP address of the computer running the Squeezebox server software. The Squish Player should show up in the player drop-down list. The default name given to the player will be "SoftSqueezeX" where "X" is a number from one and up.

While in the web browser connected to the Squeezebox server, select the "Settings" link at the bottom of the web page to configure the Squeezebox server to work properly with the Squish Play service.
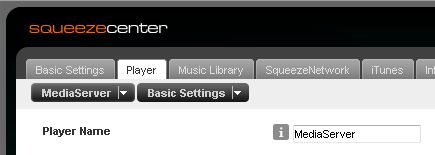
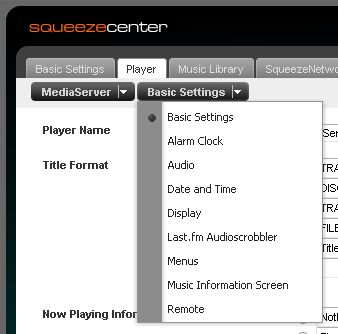
First you probably do not want you player name to be displayed as "SoftSqueezeX". To change the player name select the "Player" tab in the setting web page. Make sure the correct player name is selected in the far left drop down list. In my case the Squish Play player is configured with a display name of "MediaServer", the name of my Windows Home Server. The drop down list beside the player selection is used to select what group of player settings are displayed in the web page. Select "Basic Settings" in the drop down list. Edit the "Player Name" field to set your desired player name. Finally press the "Apply" button at the bottom of the settings web page to save the changes.
The current version of Squish Play requires that internet audio is streamed by the Squeeze Center server in proxy mode, The current version can not direct stream. I will fix this issue in the next release of Squish Play. In the "Player" options tab select the "Audio" options in the options group drop down list.
At the bottom of the player audio setting web page set the "MP3 Streaming Method" to "Proxied Streaming". Press the "Apply" button at the bottom of the settings web page to save the changes.
The final setting we need to deal with is to configure the audio stream formats to be sent to the player. The settings are found in the "Advanced" tab of the Squeeze Center settings web page. In the "Advanced" tab select the "File Types" settings group.
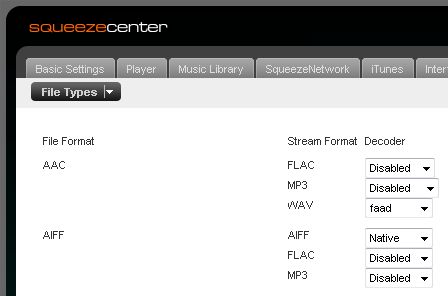
Squish Play service natively supports WAV, AIFF and MP3 audio formats (more to come in the future). The Squeeze Center/Squeezebox server can convert any of its supported audio formats to one of these formats. To prevent any loss in audio quality you should select WAV or AIFF. This way the Squeeze Center/Squeezebox server will convert the audio to PCM uncompressed and stream the PCM audio to the player. I do not recommend streaming any continuous media using wireless (yes even 802.11 N). If you are not running the Squish Play service on the same computer as the Squeeze Center/Squeezebox server then the two computers should be connect on a 100Mb or faster wired network.
Go through each of the "File Format" rows and enable either WAV or AIFF "Stream Format" decoder and disable all other decoders listed. Press the "Apply" button at the botton of the settings web page to save the changes.
At this point the Squish Play service should be ready to go...

